Showing posts with label Projects. Show all posts

Thursday, August 18, 2011

Guest Seating Chart Game

In the previous post I mentioned that I'd be letting a lot of "cats out of the bag" by sharing secret projects Mr. Hess and I had worked on hard for our wedding day...and here's a FUN one!

When it came to the seating chart for our guests, we really wanted to do something creative and interactive.  At first, we were going to just use our favorite movie quotes about love on each table, but then we conspired together and came up with a great scavenger hunt type of game for our guests to play during cocktail hour in order to find where exactly they were supposed to sit!

The seating chart looked like this, 
but before you get confused let me explain:


Each guest's name was listed in a group of ten under a popular quote from one of our favorite movies.  As a guest, you were to look for your name and then identify what movie the quote it was under is from.  We tried to match certain movies with certain personality types, or to people who would know what movie that particular quote came from.  The whole point of this was to give the guests something to do during cocktail hour, while Mr. Hess and I finish up our wedding photos.

It was finally the wedding week and we had to put this thing together.  I'm not going to lie...this project turned into a pretty big headache pretty quickly, but that's what I've always heard about seating charts - regardless.  So, why not make it fun?!  It was a Monday night when we started this puppy and it probably took about 5 good hours for 2 nights to finish it off.  Now, this time wasn't ALL on the craft part...but also on placement of our guests, which can take FOREVER!

Night 1: We get into the nitty gritty.  It was finally time to decide who sat where with who.  This can be a nightmare if you have a ton of guests who don't know each other, or if you have a large number, but thankfully our guests were extremely easy to work with and pair up.  At least half of the room knew each other, if not more than that, so once we paired people up it didn't take that long to place them at certain tables.  Since we had a sweetheart table for us, we decided to use the tables surrounding the dance floor for Bridal Party and our immediate families only.  After being a bridesmaid in a few weddings now, I have preferred to sit at a round table with my date and other members of the Bridal Party, rather than sitting at a head table...simply because you're sitting next to people in one straight line and you can't really talk to anyone but the 2 people next to you.  PLUS, OUR Bridal Party was the size of a kindergarten classroom, so adding dates to that and sitting everyone at one table just wasn't an option.

closeup of the chart - but overexposed so you can't see names!

We had 8 main tables for family and Bridal Party and the rest were filled with our wonderful friends.  I know people think placement of certain people or certain tables is for a reason, but honestly it's NOT!  I felt bad placing some friends in the corners of the room...but SOMEBODY has to sit there!  We tried to seat everyone as fairly as possible, and realized our reception was probably the type that people wouldn't be sitting in their seats for very long anyways, so we concentrated more on getting the game together than worrying about hurting people's feeling with something that's truly inevitable.

The first night we spent pairing people up, placing them at tables, and picking out our 20 favorite movies to use quotes from.  When Night 2 approached, it was all about putting it all down on our chart and making the game happen.  It was hard to pick just 20 movies, and agree on them with Mr. Hess because we are both HUGE movie buffs.  We finally decided on our bunch and here's some of my favorite highlights:

"Wawawewa...I Like You!"
"Slippery Little Suckers."
"Nobody Puts Baby in a Corner!"

Can you think of the movies any of those fabulous quotes came from?  Well, just in case you have no idea we made a CHEAT deck of cards with the corresponding movie to movie quote on each one.  (By the way, the first one was from Borat, the second was Pretty Woman & the third was Dirty Dancing...all of MY FAVS!!) We gave a copy of these movie to movie quote cheats to our wedding coordinator, as well as kept it hanging on the seating chart itself.

Here's an example of a movie quote that would be above the guest's name.

Flip the card over to see what movie it came from.
Here's the CHEAT cards we had hanging on the chart.

Once you found your movie, then it was time to look for your table!  Each movie was attached to the back of a picture of us found on each table.  We decided to use our Engagement Photos for all of the tables, except for our family tables, which my mom requested we use our Baby Photos for instead.  Since we had all of them scanned and out from our slide show, I thought it was a great idea and turned out absolutely adorable.

The front had our pictures and the back had the movie covers.

Pretty simple, once you get it - RIGHT?!

Find your name under a quote, think reallllllly hard about where that quote came from, (use the cheat sheet if you can't think of it), get the movie & look for the table with your movie on it! 

This was the title on the top of the chart...GOOD LUCK! :)

We thought this idea was genius and was a fun way to keep our guests entertained throughout cocktail hour.  At first, my parents thought it might be too confusing for guests, but Mr. Hess stood strong on making this happen and we figured out a way for them to cheat and ask the wedding coordinator as well...so we were eventually all on board.  The only bad thing about this adventure is that Mr. Hess and I completely missed it! :( Of course, that's what it was designed for, but we were still kind of sad we didn't see all of the action and chaos throughout the game.

So there you have it!  Most people use table numbers or love quotes, but we decided to use a flipping scavenger movie quote hunt to seat our guests.  Go figure!  Now you can see why I barely did any posting in July...THIS was the kind of stuff we were working on!

From what we heard, the game was fun and definitely kept people busy.  I can't wait to see the video during cocktail hour - and how the guests perceived it.  As a guest, the last thing I want to do is sit there waiting on the Bride & Groom while looking at my watch thinking "when is this thing going to start?!" If you're getting married, I would totally suggest doing something fun and entertaining during cocktail hour, and just know that you're going to miss out on it.  Believe me, it might be a bit of a headache at first, but if you plan your time accordingly your guests will thank you in the end.

I guess that's it for now...
stay tuned for more wedding secrets coming soon!
Mrs. Presh

Tuesday, August 16, 2011

Adding the Irish & Scottish "touch"

I had been debating back and forth on whether or not to post on the next subject before the wedding, and finally decided it would have to wait until after the big day was over.  There were so many special touches Mr. Hess and I put into our wedding, it was hard for me not to share them ALL with you before the wedding day, but I'm excited to say that I can finally share it allllllllll now, post by post!

First on the revealing list? Wedding Hint #8
What the heck was that thing?!

From day 1, I really wanted to incorporate the Irish heritage into our wedding. Since Mr. Hess's heritage is Irish & Scottish, he was totally on board with this idea.  Originally, we wanted to get married around St. Patricks Day and have different shades of green and white as our colors, green hydrangeas, Irish food...the whole 9.  But, timing for us & a wedding in March was impossible. Knowing this, we both agreed to incorporate little things here and there that represented both, but mostly the Irish heritage.  So I hopped onto the computer and started googling "Irish Wedding traditions" and found several ideas right away.

My DIY Handfasting Cord!

My favorite Irish touch at our wedding was the unity ceremony called Handfasting.  We really, really wanted a different way to unite our lives during the ceremony than the standard unity candle, or sand ceremony and when I found this I knew it was something we HAD to do.  First, I hopped online to try to find the perfect cord for us...and big surprise, I didn't find exactly what I wanted so I made my own!  It isn't that difficult to make your own cord...but unfortunately, I threw our cord together literally RIGHT BEFORE the ceremony rehearsal and didn't get to document putting it together like I wanted to.  (Brides...you'll see how fast the wedding week you took "off" of work goes and how many last minute projects to truly have!) For this reason, I don't have step-by-step pictures, but what I can tell you is what you would need to make a handfasting cord:

  • 3 cords - 3 different colors.
  • clear duct tape
  • ribbon
  • embellishments (optional)
  • scissors

When I first tried to put a cord together, I started with ribbon only - I picked out 3 different types of each color (pink, green and white) and I planned on braiding those together first to create my own cords.  After a few failed attempts, I decided to call that task quits and search for actual colored cords.  I found the 3 colored cords pictured at The Sewing Studio in Maitland.  You might be able to find similar ones a JoAnns or Michaels, but I'm not positive on that one.  Hanfasting cords have to be long enough to wrap around each persons wrist, so you should get anywhere between 4 - 6 feet of cording.  Knowing I had crosses at the bottom to hang, I opted for a yard and a half (or 4.5') and it turned out to be the perfect length.


Next, I put the 3 cords side by side and put a heavy book on top of them so I could braid it together.  This was not challenging, but tricky to keep the same look throughout the entire cord...so be sure to see how much length and width you're giving each part of the braid.  When I finished braiding, I took some clear duct tape and wrapped it around the two edges of the cord.  I knew I wanted to add dangling crosses to each side, so this is where I put part of the pink cord I didn't use through the loops of both crosses, dangled them on each end, and taped extra pink cording to the end of each side.  I got these beauties at Michaels in the beading department and thought they were the perfect addition!


Since taped on dangling crosses doesn't look the prettiest, this is where the ribbon comes in.  Cut two strips about 4 inches long of your ribbon of choice and wrap one around each tape gathering.  I used more clear duct tape to fasten the ribbon on the back of the cord, but ideally if I had more time I would have preferred to have sewn it instead.

VOILA!  Your very own easy to make DIY Handfasting cord:

Although, it's not tied right...because it's only me tied into it!

We knew our guests wouldn't really understand right away what exactly what we were doing tying ourselves together with this cord, so we decided to explain it in our ceremony program which read:

Handfasting:
An ancient Celtic tradition practiced when a couple could not afford a formal ceremony, or when a priest could not be found, this involves literally tying the couple together by the wrist in a sign of unifying their lives.  A couple would traditionally only be bound for one year and a day, sparking the phrase "forever and a day," although we plan to be bound for life.

They will be wrapped by a cord of three ribbons: a green one representing him, a pink one representing her, and a white one representing Christ.  The pastor will form a unity symbol around their wrists with a cord, and then he will tie it in a knot to seal the unity.  This is also where the phrase "tie the knot" originated.

When we explained the idea of Handfasting to our Pastor, he loved what it represented but also saw it as a challenge when it came to tying the thing correctly!  Luckily, he practiced on the Groom & a groomsmen before the ceremony, so it went perfectly.

Another Irish tradition I had on the big day was incorporating things into my wedding day attire.  It is thought of to be good luck for the bride to wear blue on her wedding day, but I wasn't too sure about that one...so we added blue a different way - in all of our bouquets!  In my bridal bouquet, as well as in all of the bridesmaids bouquets sat 2 blue pins: 1 representing me and 1 representing him, standing together.

This is the "back of the bouquet" where the pins faced the girl.

closeup of the pins...but that's not where they were in the bouquet.

Next? I found that it is also tradition for and Irish bride to wear her hair in a braid.  Since I wanted to wear my hair mostly down, I though this might be somewhat of a challenge.  It took me the LONGEST time to decide on a hairstyle...since I kept going back and forth on whether I wanted a flower, a broach, a headband or what...and how to incorporate a braid into it.  With the help of my bridesmaid Lauren & my hairstylist, I decided on using fresh lime green orchids to pull it half up. On that side of my hair that was back, we put 2 finely braided pieces that met in the middle at the flowers.  Not many people would probably notice this, but when pictures finally come back I'm sure it will be noticeable at least in a photo or two - and I knew it was there...so it made me happy.  Once again, the braids represented 1 for me, 1 for him and the two of us standing together.

Here I am with 2 of my Irish bridesmaids - and...shamrock mints!

Last, we wanted to have the Scottish heritage represented as well, so the best way we thought of doing that was having a bagpiper!  He was great, and played during our guests arrival to the church ceremony, as well as on their way out to the reception.  He was in full Scottish garb, and we got a lot of compliments on him.  Honestly, I didn't get to see this...because I was at the church earlier than he was supposed to show up - but from what pictures I've seen, he looked great!  Unfortunately, I don't have any of my pictures back yet to share ours with you, but you get the idea:


Little by little, I'm starting to learn more about the Irish & Scottish culture and next on my list for of expanding my new heritage is to learn how to cook some of their famous dishes!  I'm sure Mr. Hess wouldn't complain...shepard's pie is one of his favorites and allllllllllmost made the appetizers list.  Keep on the lookout for more secret special touch posts coming your way!

Until next time,
Mrs. Presh


Thursday, July 14, 2011

DIY Aisle Decorations

We are certainly getting down to the FINAL COUNTDOWN here - the wedding is officially a WEEK away! I have spent the last 2 weeks or so getting ready for the festivities by tying up all of the loose ends, finalizing all of our vendor plans & finishing up any crafts or decorations needed for the BIG DAY.

So far, this has been one of my favorite projects.  From the beginning, Mr. Hess and I knew that even though our ceremony will be inside of a church, we still wanted to be able to decorate it with a cool & even casual style.  Our chapel already included brass candelabras for each aisle, but to be honest that just wouldn't do for us.  If anything, we were going to rent silver ones to go with our color scheme, but that just seemed like an unnessecary expense.  After a little bit of researching online, and looking at wedding blogs, I finally came across a picture that gave me instant inspiration:


DUH! I have already given you all a Wedding Hint in the past that lets you know we will be using paper lanterns and decorations, but little did you know they would also be incorporated into our ceremony too!  Since the time I saved this picture onto my computer, I was on a mission to figure out how to make these babies on my own.


Step one was to find a place to get paper lanterns in the size and shape that we needed for the aisles.  Pretty quickly, I came across a great website that offers lanterns and other similar products in lots of shapes, colors, and sizes at a very reasonable price from a company called Just Artifacts. I found a few shades of pink that I was debating between, as well as size of lanterns that would look the best hanging from the pews.  So, a great idea my mom suggested to me was to order 3 lanterns to sample: 1 in each shade of pink, 2 different sizes, and 2 different textures.  When the lanterns came in (surprisingly fast after about 3 days) I was instantly drawn to the EXACT pink color of the bridesmaid dresses and knew I needed the Dark Magenta in 8" to get the look I was going for.

By now, you all know our other main color in our wedding scheme is lime green, so I decided the ribbon and bow should be this color.  By trial and error, I realized the cloth type of fabric was the best to use for this type of thing, over the transparent or shiny types of ribbon.  The cloth holds the lantern straighter, is sturdier & gives the lantern and ribbon combo a cleaner look.

So, I had the supplies...now it was time to put these decorations together.  I promise that once you get the hang of it, these really don't take much time at all to assemble.  My mom and I came up with a great system to keep the ball (or lanterns) rolling while assembling them.

Below is all you will need for this DIY Aisle Decoration:

I took this picture before I figured out exactly what would work best...
But, I finally figured out: 

  • Paper lanterns.  I ordered 2 more than I needed, just in case.
  • Ribbon (to get through 16 lanterns we needed 6 spools).
  • 12" ruler, or measuring tape
  • Stapler
  • Scissors
  • Lighter
Pretty easy (and affordable) list if you ask me!  


First, I measured out how long the ribbon should be that's holding the lantern.  I wanted them to hang like the picture above, so I figured out cutting about a foot and 3 inches would do the trick.  Next, I had to figure out how to tie the bow and how long that ribbon should be.  Honestly, I didn't make the bow strings as long as I originally wanted them to be, but we were running out of ribbon and I'm pretty sure my mom and I bought out ALL of the local Michaels lime green ribbon spools...so we kept them a little bit shorter.

My mom, hard at work with me!
After the ribbon was cut and lined up for me to assemble to the lantern, I looped the ribbon through the metal wire part in the middle and stapled the two sides of ribbon together to form one big loop.  Staples turned out to be the best route to go, over tape or glue - and it took 2 seconds to do!  Also, I used the "bottom" of the metal part of the lantern's middle to loop the ribbon through so it was flatter and easier to loop.  That means there will be the top hanger part hanging on the bottom, but nobody is going to see that...so it didn't bother me to keep it there.  If it bothered you, you could easily take a pair of wire clippers and cut the hanger part off.

By this point, I needed to anchor the lantern somehow to be able to tie the bow in place.  I had one of Mr. Hess's gadgets that resembled a hook on the table to hold it in front of me.  I tied the shorter ribbon on the top of the lantern to make a bow, very similar to how I did for my Bridal Party T-shirts.  (By the way, this is the same ribbon I used for those...now do you see what I bought the entire inventory?!)  When the bow was tied, I used the same technique as before by cutting the ribbon at an angle and burning the edges with a lighter to keep the ribbon from fraying.  You can read all about these techniques in my post: Bridal Party Tanks.


So there you have it!  A simple, unique, fun and certainly cost effective way to decorate your aisles for your wedding ceremony! I could also re-use this idea for other events down the road, and know it would be great to decorate with anywhere from a backyard barbecue to a baby shower.  After assembling these, I am SO happy with how they turned out and I can't wait to see how they look at my actual wedding ceremony with all of the other decorations around them.  I am getting SO excited for everything to come together, and I couldn't be happier with how all of these little "project ideas" in my head are really working out. 

Thank you, Jesus for google image search.  I'm telling you, it's the only thing that's gotten me through this wedding planning process of keeping a budget. 

Hope you like them, and keep a look out for one more crafty post before the wedding.

ONE WEEK AWAY!!! Can't believe it! :)
Presh

Monday, June 20, 2011

Making those wedding day shoes MINE!

Let me just start out by saying I found THE perfect pair of wedding shoes for my entire dress/wedding ensemble.  I found these fabulous shoes after my first dress fitting back in last October, however I didn't get them then.  I fell in love with the look of my dress with these shoes, and also the accessories that just so happened to appear on my body (funny how bridal consultants can do that!).  So naturally, I saw the entire look together and had to have everything.

Well, I didn't get everything exactly from that day of wedding day dress up, but I did know the look I wanted when picking out all of my accessories.  I am pleased to say that shopping for my accessories is officially over, and has been for quite some time!

Now back to the shoes...after debating back and forth, I finally decided I needed THESE shoes for the big day.  GOOD NEWS! When I called the bridal shop, they informed me that this particular shoe was being discontinued and they were 50% off.  Well, that's alllllllll you had to tell me because that made justifying getting these shoes THAT much easier, so thank you Priscilla of Boston! :)

I've been storing my dress, my shoes, and my accessories at my parents' house for two reasons...1) because I know where it's at and everything has a place and no one will touch anything and 2) Mr. Hess can't go snooping around and find anything he's not supposed to!  About a week ago, I was at my parents' house and decided I was going to take my wedding shoes home to "finish them off"...and what do I mean by this?!

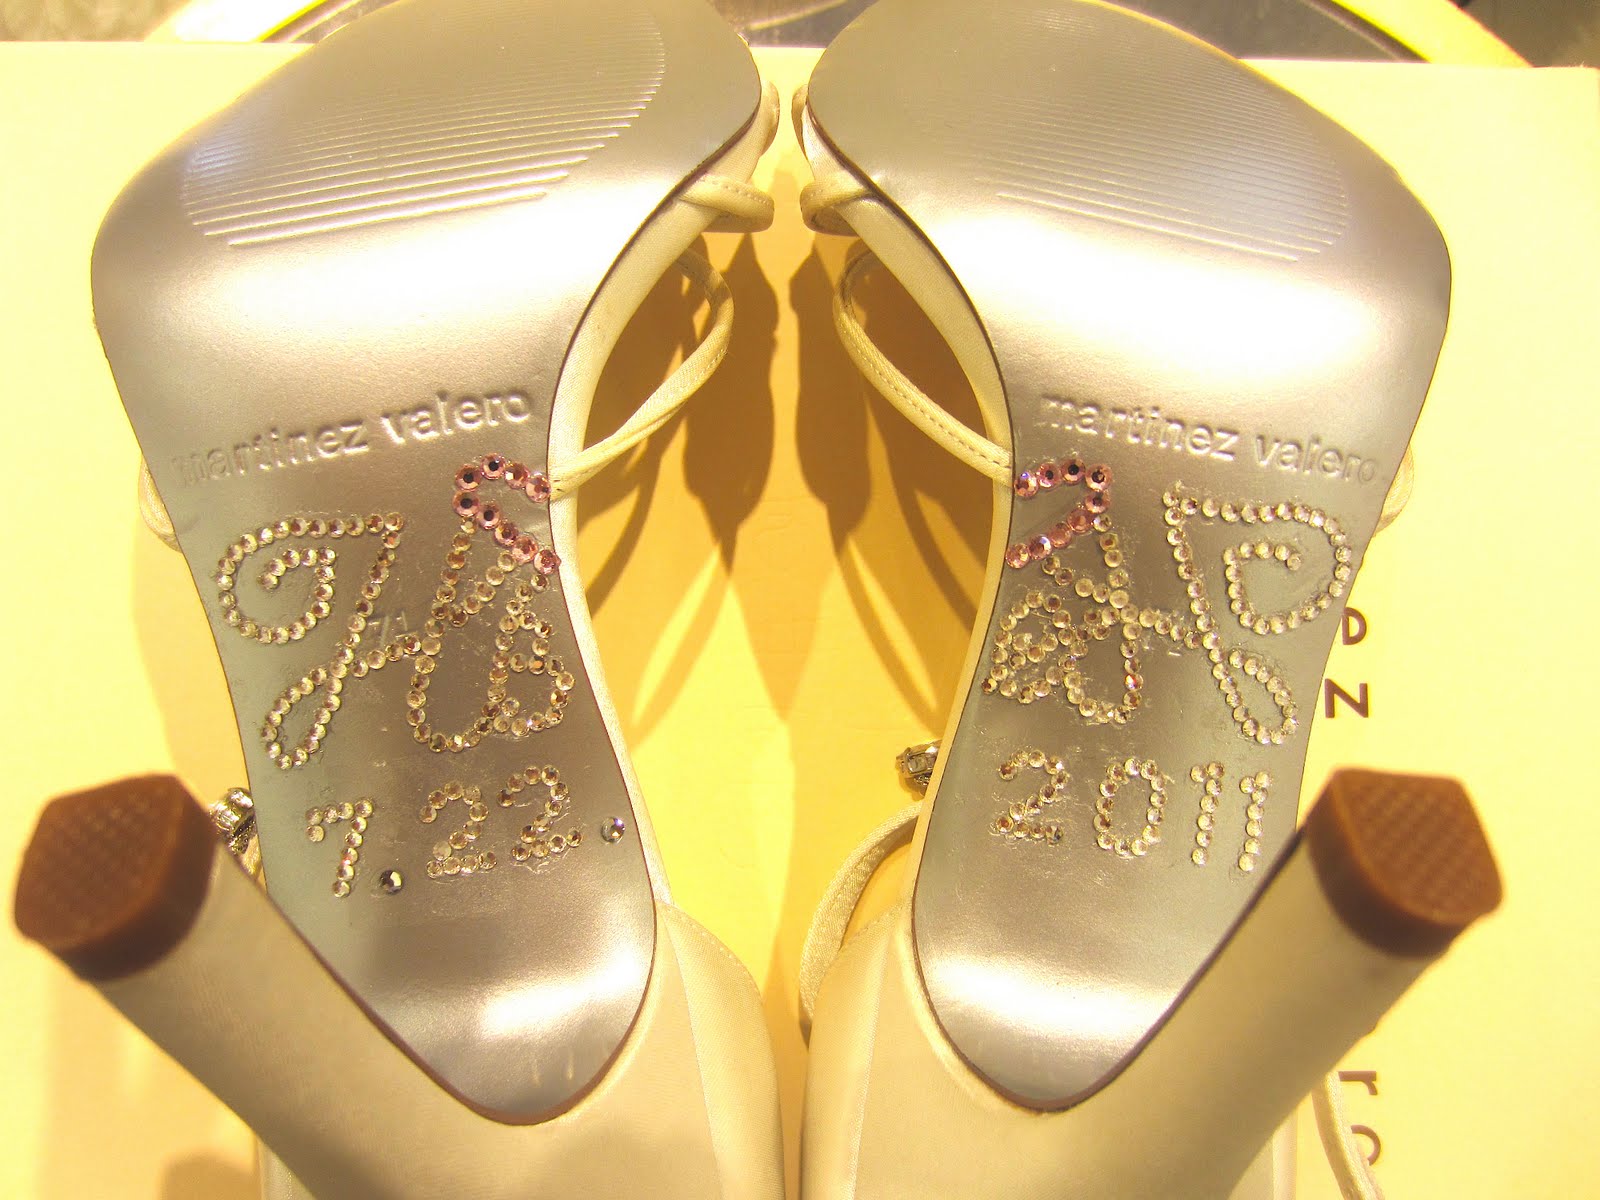
I knew from day one that I wanted to write something special on the bottom of my wedding shoes.  We had already used this idea in our Save the Date photo by putting the wedding date on the bottom of our shoes in the picture and I thought it would be cute to tie that in for the BIG DAY!  Some brides write the words "I DO" or their wedding date, or even their names in sparkling rhinestones.  When Mr. Hess and I created a logo with our monogrammed HBSH initials, I knew that's EXACTLY what I wanted to do!  I knew it wouldn't be the easiest thing, but I was determined...and I have to say it was a lot easier than I thought it would be!

I know it's not the most time efficient way to spend wedding planning hours, but believe me - this was just the mental release I needed.  Some might get frustrated with the tedious task of gluing every single little stone on the shoe just right, but to me it was relaxing.  I wish everything was like bedazzling! ;)

So, without showing too much of the wedding day shoes, here they are!

I know it's just the back view, but you can kind of see where I bedazzled them!
Adorable right?!  I thought so anyways :) Bedazzling your wedding shoes isn't as hard as it looks.  You only need a few things to make it happen, with patience being at the top of that list.  Besides that you'll need:

  • Your perfect pair of heels (wouldn't work on the bottom of flats)
  • Rhinestones (the smaller the better)
  • Permanent Jewel Glue
  • toothpicks
  • paper towels 

You can order rhinestones online, but I just picked up a few packs of rhinestones from Michaels.  They come in all different brands, colors, shapes and sizes.  I chose to use the brand Crystazzi just because they had the small stones I was looking for and put a lot in one package for a good price.  They do sell swavorski crystals at Michaels, but this bride's been on quite the budget lately, so they proved to work just fine!  I bought a 3-pack of tacky glue that included the middle one being permanant jewel glue.  I wasn't sure how this would work on the bottom of shoes, and the glue didn't seem like it would work at first, but once it dried those stones stayed right where they needed to.  It's made to adhere jewels to fabric, but trust me...once it dries - you're golden!  I was getting worried when I could move the jewels around with my toothpick, but this also came in handy to move every stone exactly where it needed to be before it dried.  So, if you ask me it's the way to go over using superglue.

Bedazzling can be fun and a release of stress if you have a little bit of patience and time.  I actually looked forward to doing this project, and it took me about 3 full hours to do.


First, I stenciled the design I was going to be bedazzling onto my shoes with pencil on the soles of the shoes.  I was a little nervous about drawing on them, but the pencil line really helped me make the exact design I wanted.  Next, I laid out a paper towel and put the stones I would be using onto it, face down.  I put a dab of the jewel glue onto the paper towel (just be careful to put something under it so it doesn't go through onto your table).  From there, it was easy to take a toothpick, dip one end into the glue, and select the stone I was going to adhere to the shoe.  Like I mentioned earlier, the glue isn't going to immediately stick, so don't worry if it slips a little.  You can use this to your advantage by using the other side of the toothpick to move the stone on the penciled line exactly where it should go.

I decided to do the design facing the way I did so that when I'm wearing them my photographer can take a photo of them on and it will read the right way (from left to right).  If Mr. Hess and I were doing a kneeling bench at the ceremony (which we decided not to) I would have done the monogram facing the way that the guests would be looking at my shoes.


Stone by stone and letter by letter, you will get through it and the shoes you love will turn into your PERFECT wedding day shoes!  I know I am going to wear these shoes with the biggest smile on my face, knowing how much they mean to me.

 I hope this helped anyone who needed inspiration to get this look on their own...but if you have any questions at all, I love bedazzling, so let a sister know! ;)

LinkWithin

Related Posts Plugin for WordPress, Blogger...

Share this!