
Well, I didn't get everything exactly from that day of wedding day dress up, but I did know the look I wanted when picking out all of my accessories. I am pleased to say that shopping for my accessories is officially over, and has been for quite some time!
Now back to the shoes...after debating back and forth, I finally decided I needed THESE shoes for the big day. GOOD NEWS! When I called the bridal shop, they informed me that this particular shoe was being discontinued and they were 50% off. Well, that's alllllllll you had to tell me because that made justifying getting these shoes THAT much easier, so thank you Priscilla of Boston! :)
I've been storing my dress, my shoes, and my accessories at my parents' house for two reasons...1) because I know where it's at and everything has a place and no one will touch anything and 2) Mr. Hess can't go snooping around and find anything he's not supposed to! About a week ago, I was at my parents' house and decided I was going to take my wedding shoes home to "finish them off"...and what do I mean by this?!
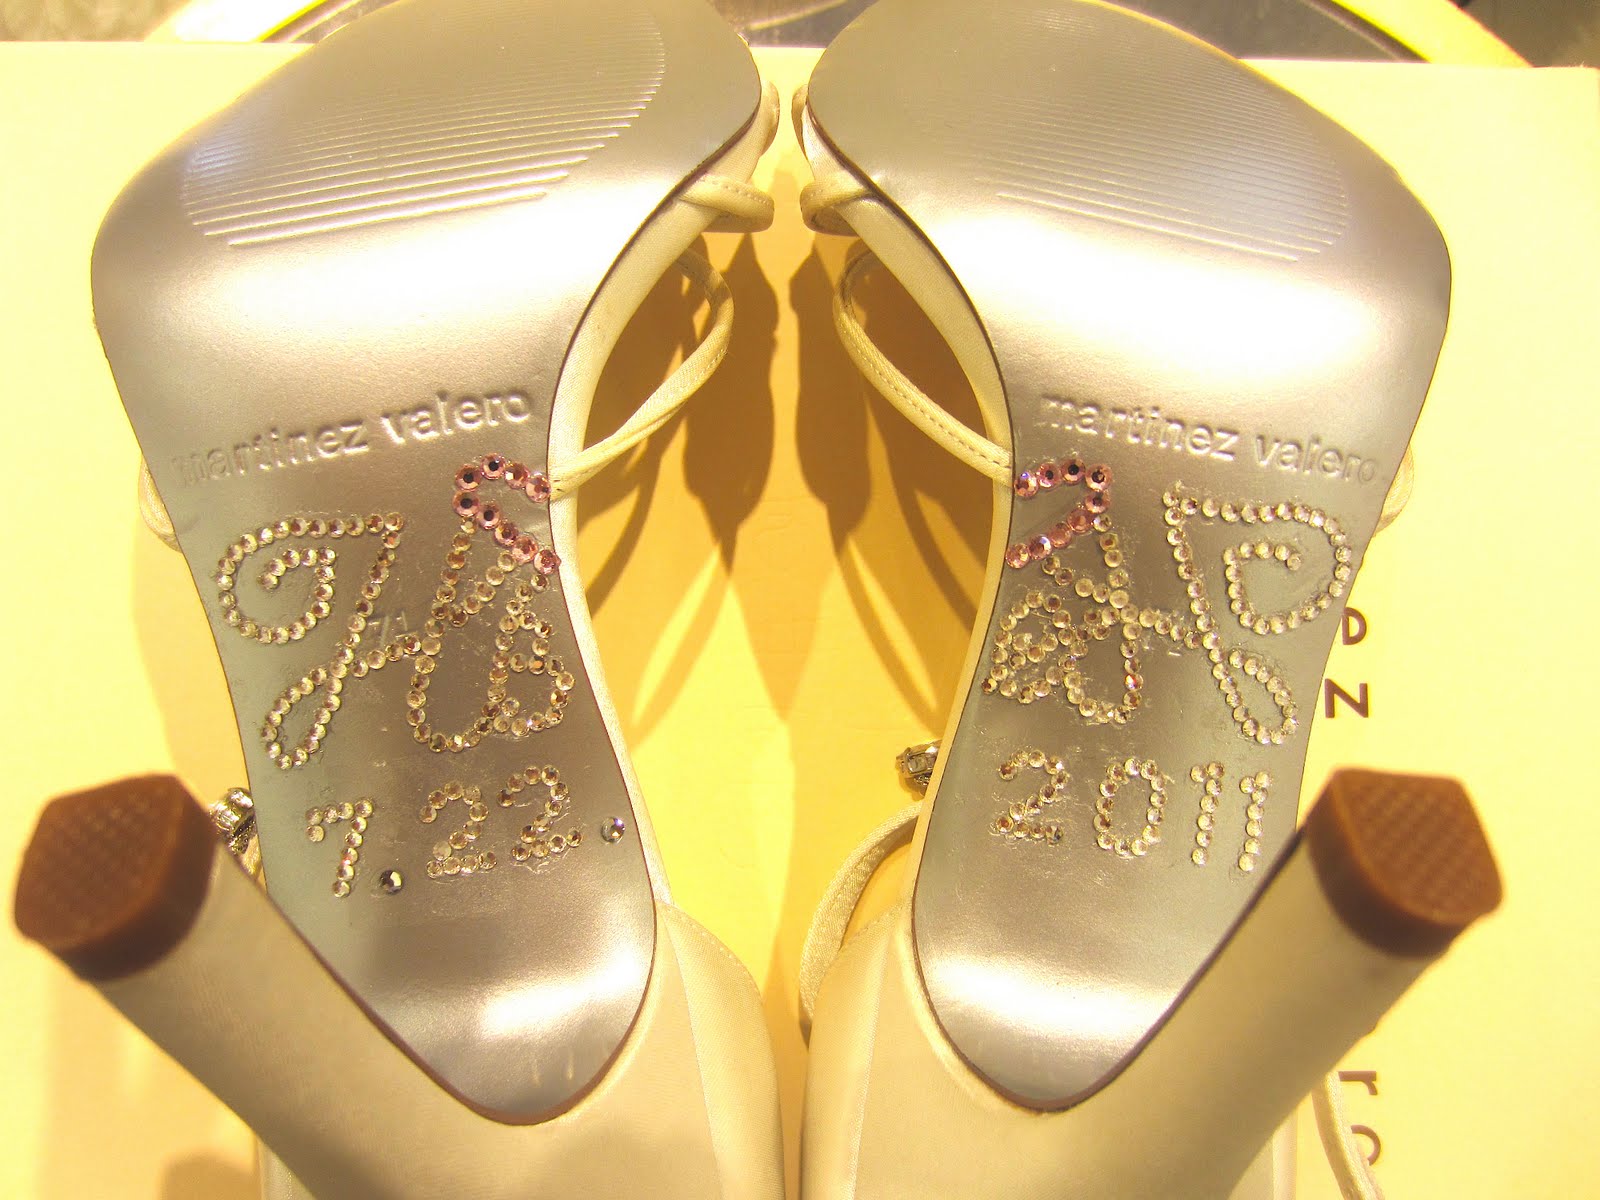
I knew from day one that I wanted to write something special on the bottom of my wedding shoes. We had already used this idea in our Save the Date photo by putting the wedding date on the bottom of our shoes in the picture and I thought it would be cute to tie that in for the BIG DAY! Some brides write the words "I DO" or their wedding date, or even their names in sparkling rhinestones. When Mr. Hess and I created a logo with our monogrammed HBSH initials, I knew that's EXACTLY what I wanted to do! I knew it wouldn't be the easiest thing, but I was determined...and I have to say it was a lot easier than I thought it would be!
I know it's not the most time efficient way to spend wedding planning hours, but believe me - this was just the mental release I needed. Some might get frustrated with the tedious task of gluing every single little stone on the shoe just right, but to me it was relaxing. I wish everything was like bedazzling! ;)
So, without showing too much of the wedding day shoes, here they are!
 |
| I know it's just the back view, but you can kind of see where I bedazzled them! |

- Your perfect pair of heels (wouldn't work on the bottom of flats)
- Rhinestones (the smaller the better)
- Permanent Jewel Glue
- toothpicks
- paper towels

You can order rhinestones online, but I just picked up a few packs of rhinestones from Michaels. They come in all different brands, colors, shapes and sizes. I chose to use the brand Crystazzi just because they had the small stones I was looking for and put a lot in one package for a good price. They do sell swavorski crystals at Michaels, but this bride's been on quite the budget lately, so they proved to work just fine! I bought a 3-pack of tacky glue that included the middle one being permanant jewel glue. I wasn't sure how this would work on the bottom of shoes, and the glue didn't seem like it would work at first, but once it dried those stones stayed right where they needed to. It's made to adhere jewels to fabric, but trust me...once it dries - you're golden! I was getting worried when I could move the jewels around with my toothpick, but this also came in handy to move every stone exactly where it needed to be before it dried. So, if you ask me it's the way to go over using superglue.
Bedazzling can be fun and a release of stress if you have a little bit of patience and time. I actually looked forward to doing this project, and it took me about 3 full hours to do.

First, I stenciled the design I was going to be bedazzling onto my shoes with pencil on the soles of the shoes. I was a little nervous about drawing on them, but the pencil line really helped me make the exact design I wanted. Next, I laid out a paper towel and put the stones I would be using onto it, face down. I put a dab of the jewel glue onto the paper towel (just be careful to put something under it so it doesn't go through onto your table). From there, it was easy to take a toothpick, dip one end into the glue, and select the stone I was going to adhere to the shoe. Like I mentioned earlier, the glue isn't going to immediately stick, so don't worry if it slips a little. You can use this to your advantage by using the other side of the toothpick to move the stone on the penciled line exactly where it should go.

I decided to do the design facing the way I did so that when I'm wearing them my photographer can take a photo of them on and it will read the right way (from left to right). If Mr. Hess and I were doing a kneeling bench at the ceremony (which we decided not to) I would have done the monogram facing the way that the guests would be looking at my shoes.
Stone by stone and letter by letter, you will get through it and the shoes you love will turn into your PERFECT wedding day shoes! I know I am going to wear these shoes with the biggest smile on my face, knowing how much they mean to me.
I hope this helped anyone who needed inspiration to get this look on their own...but if you have any questions at all, I love bedazzling, so let a sister know! ;)
2 comments:
OMG, Heather this is the cutest thing ever!!!! I may just have to steal it ;) You are so creative and do so well with the DIY stuff!
That is Awesome!
Post a Comment